E30 Late Model Front Lips - How to Install

How to Fix Deformed Plastic Front Lips
During the shipping process, the lips may sometimes lose their original shape. DO NOT WORRY! These are designed to go back to their original shape when heated and treated properly.
Here is a video showcasing how to get your lip to its original shape before installing it onto your car.
OEM E30 "IS" Lip Install -
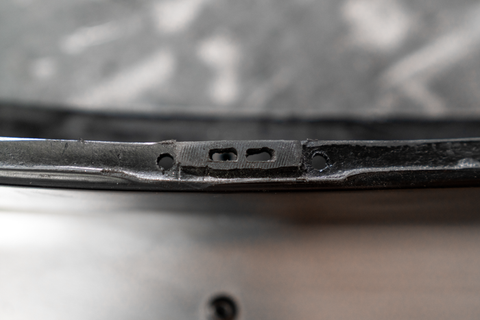
For late model BMW E30's equipped with a late model metal front valence, installing the OEM "IS" front lip is a straight forward process. You would simply install x10 OEM BMW clips (BMW PN: 51711979334) onto your valence and press the lip into the clips until they snap in place.
Installing the clips are as easy as pressing them into the holes under your valence and pushing in the plastic locking cylinder into place.


OEM STYLE E30 "IS" Lip Install - OEM Clip Method
The OEM Style "IS" Lips that we offer are a great, cheaper alternative to the factory lip. For a part that will be undoubtedly beat and battered by rock chips and other road debris, spending the money for an OEM lip sometimes doesn't make economical sense.
Our IS lips, however, sometimes need slight modifications to fit the OEM clips.
As shown below, the molding around the clip on the lip may sometimes need to be filed or sanded to fit the clips.

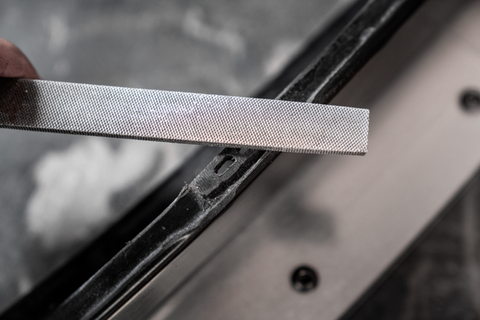

Once you get them filed or sanded to a thinner profile so that the clips can go on, the installation will be the same as the OEM lip as seen in the previous section.
OEM STYLE E30 "IS" + FLAT STYLE Lip Install - Zip Tie/Cable Tie Method
Applicable for -
While using factory clips is often recommended, the clips are known to break fairly easily and they are also known to release from the lips with fairly little force if pushed or pulled in a certain way- especially when scrapping on driveways or bumps.
Some of us here at Garagistic prefer to mount the lip with cable ties instead which can be a more secure mounting method in some cases. The only modification needed to your lip would be to drill holes on the lip for the cable ties.
Step #1
Mock-up a factory IS lip clip next to your lip. Mark the lip with where the mounting holes on the clip would land as seen in the photo below

Step #2
Drill a 1/4in hole
Repeat this step for the rest of the clip locations.
Step #3
Using zip ties/cable ties, loosely secure the lip to the valence using the clip mounting holes. Once you have a zip tie loosely connected through each hole, you can then tighten and secure them all.
If you still have some factory IS lip clips installed in your valence, you can easily remove them by pushing the plastic cylinder on both sides of the clip with a small screwdriver.


Below are photos of an E30 equipped with our "IS" Style front lip using the ziptie/cable tie method.


Note - Gap between lip and valence in the photo are from a bent valence
RG STYLE E30 Lip Install - Zip Tie/Cable Tie Method
Applicable for -
The RG Style late model front lips are shaped to fit only the late model valence; the same style valence you would need for an "IS" lip. The difference, however, is the top of the lip is simply flat and there are no clip mounting locations.
Step #1
To mount these lips, you will need to remove all the OEM clips on your valence if you haven't done so already. To do so, use a small screwdriver to push out the plastic cylinders from the clips. You can then carefully remove the plastic clip.


Step #2
Mock-up the RG lip to your valence and take note of where the holes on the valence are from where the clips were mounted on. Mark the top of the plastic lip where these holes on the valence line up.
Step #3
Drill a 1/4in hole on the top of the plastic lip where you had marked. Be sure to constantly check where the holes line up and be sure to take into account how far forward you drill the holes as they will effect how flush and even the lip will look when mounted to your valence.
Step #4
Using zip ties/cable ties, loosely secure the lip to the valence using the clip mounting holes. Once you have a zip tie loosely connected through each hole, you can then tighten and secure them all.
Below is our K24 swapped E30 with an RG Style Front Lip installed using the ziptie/cable tie method.