The Cooling system of the M30 is very simple. There are a lot of aspects to consider, but I shall discuss what it takes to get the basics up and running as well as incorporating some extra efficiency
18.2 VITALS
18.2.1
18.2.1.1 TOOLS REQUIRED

18.2.1.2 TIME & $$ 3Hrs & $20
18.2.1.3 INSTRUCTIONS
Radiator:
E28 stock radiator is slim enough to fit inside the E30 engine bay without a problem. It also provides adequate cooling. Grind off 2 tabs that the original M20/M10/M42 radiator sat on as the E28 535i radiator still has to go down 4-5 inches. The top of the radiator will line up with two holes that should be present on the E30. You can grind down the tabs with the engine in or out of the car. It’s just a lot easier with it out. Please see Figure 33 .

View looking forward with engine removed. The tabs in the Red circles must be removed so it’s completely flush as if it was never there. The radiator will then sit on the shelf denoted by the teal arrows and depending on your lateral position, it will mount to the Green circled holes. However, you can always drill holes in the radiator support wherever you want. The bottom of the radiator will still need to be secured to the support bracket somehow. Be creative. The E30’s from 83-92 vary slightly with where and how many holes are present, so if you must drill to screw it in, then so be it.
The radiator to be used is an E28 535i or equivalent width. Some have thought to use the M20 radiator and this is a false mode of thinking. The M20/M10/M42 radiator, while not only thicker, provides the inlet/outlet hoses to be exactly opposite of the E28 535i radiator. Please see Figure 34.

Hoses:
Here are the hoses I used:
Upper radiator hose: E32 (heater core) OR E28 Hose (no heater core routing)
Lower radiator hose: E28 Part Number 2 in Figure 35
Other Heater core hose: E30

Upper radiator hose is part #1. As you can see it has a little hose coming out of it…. This smaller hose going to the heater core will need to be cut and re-positioned in order to mate with the E30 heater core inlet/outlet pipes at the firewall. Some E28 versions do not have this extra hose. You might have to make a tee or go without heat. Lower radiator hose is part 2. Pretty straightforward and cheap to buy or find. I suggest buying it for $13.

Other heater core hose: E30 (needed to modify to tee back to the heater core as well). This is part 13 in the diagram. It’s a 3 way hose (all same diameter) and goes to the following 3 places.
1. Coolant tank reservoir
2. Heater inlet/outlet (doesn’t matter)
3. Thermostat housing
Heater Core delete is also possible by virtue of using the E28 upper radiator hose, which does not have the additional 1” tee going to the heater core. You simply use a 1” ID line from the tstat housing and run it directly to the coolant overflow tank. Thereby removing the heater core from the equation altogether.
Reservoir:
You can keep your E30 ’’88 - ‘91 reservoir. Maintain its stock location. It’s perfect and should remain in the same spot to function correctly (above the driver wheel well).
For part 13 in Figure 36 or Part 1 (small hose end) of Figure 35, you can use a brass fitting (barbed nipple) to connect hoses to make virtually whatever you want. The barbed connector you want is part number 32-097 from www.fittings4less.com. It’s a barbed brass mender. If you run out of hose, you can always go to your local auto parts store or whatever to pick yourself up some 5/8” coolant hose. Here is a picture of the 5/8” coolant hose being routed in between the manifold and brake booster. It could be a possible culprit for an air bubble, so be careful as you bleed.

Again, I used the following website MANY times for all fittings I needed for the various jobs on my conversion You can get the brass fittings to tee any size line at the following website: www.fittings4less.com. This website has ANYTHING you need to rig fuel lines, coolant lines, high pressure, low pressure. They have a wide selection and customer service is great.
As shown in Figure 38, you can see how the existing E30 ’88-’91 coolant overflow tank fits in its existing location without any issues with plumbing.

Fan:
I had a stock E30 2 stage electric fan. It cools the engine “ok”, but I could definitely do better. I was thinking of getting an E32 fan due to the larger fan blade diameter, but in the end decided to go with a SPAL fan. These fans suck a lot of amperage! (16-20amps), but it’s worth it for the cooling that it does. You can have many setups, but I will highlight 2 options.
1. The fan can run off of a low temp switch from the E28 535i radiator. The switch will be low temp switch and close at 82C. I got it from www.bavauto.com and here’s what you do. You run the switch inline with the fan and inline with the battery and have a fuse in the circuit for safety. Make sure it’s thick wiring, or the insulation will melt. I’m thinking 8 gauge is fine. Like I said, it’s very high amperage ( I haven’t measured it).
2. You can always forget the radiator switch and run a switch yourself to the fan. This is what I did and only use in during traffic conditions at hot temps. For this, I would use a relay. This way I can turn the fan on and off whenever I please. I have low amp line and the high amp line fused for safety.

What if the E30 fan itself isn’t enough? Well, it should be, even if you don’t have a clutch fan. Maybe your fan isn’t installed close enough to the radiator itself to make a substantial difference. In this case, you need to make a shroud over the circumference of the fan. It will not prohibit air getting to the radiator, it will channel the air that is being blown by the fan to the radiator to ensure that all the air goes THROUGH the radiator. This makes the fan work a little harder (suck slightly more amperage), but it makes a huge difference in the operating temperature of your engine, especially in traffic.
I had a space between my cooling fan and the radiator. This was bad because when I turned the fan on, most of the air blew outwards instead of going through the radiator. This was ineffective approach and I thought how to get most if not all the air blown by the fan to actually go through the radiator. Well, a shroud makes this possible. You can make it out of sheetmetal, plastic sheet, or any other pliable waterproof material. Here are a couple of before and after pictures.

Here is my setup initially with the E30 fan and without a shroud. Because the radiator itself has inherent air resistance, air flows to the area of least resistance, which in this case is to the sides where air can leak out…

Now the plastic makes the fan air go through the radiator with nowhere else to go. I know it’s a cheapo way to go and the material I used was inferior, but the principle is there and the fan cooled the engine better.
18.2.2
18.2.2.1 TOOLS REQUIRED

18.2.2.2 TIME & $$ 4Hrs & $430
18.2.2.3 INSTRUCTIONS
Radiator:
Your best bet to increase the effectiveness of your cooling is to either purchase a brand new E28 535i Radiator, or purchase a Moshimoto Radiator from Garagistic. You want the following radiator for maximum cooling: MMRAD-E36-92 as in Figure 42. This radiator is less than 2” wide at its max and can provide more than adequate cooling.

The Moshimoto E36 Radiator is geared as a direct upgrade for the E36, but it is easy to adapt for the E30.
It is recommended to weld brackets upon which the radiator sits. Figure 33 shows the teal arrows. Weld 2 tabs for the radiator to sit and add rubber bushings to prevent metal-to-metal vibration.
Hoses:
When using the reservoir as indicated below, you need to use the hose as indicated in Figure 35. This will guarantee that your reservoir on the firewall gets adequate hose routing without pinching any of the hoses. Be careful that the M30 intake does not pinch the 180 degree curve on the intake.
Reservoir:
After I wised up, I decided to mimic the entire cooling system as shown in Figure 35. Please see Figure 43 for a picture of what is representative of Figure 35. I was so tired of trying to effectively bleed the system of air that I decided to simply mimic the actual setup as BMW designed it for their later model 5 & 7 series M30’s.

The wiring for the coolant tank level sender must be relocated from the driver side wiring bundle to the firewall. See Figure 44 for details as to how you must modify the wiring of the coolant Tank level Sender. The wiring goes directly from the E30 body to the sender connector. There is no C101 connection here. In most cases, the wires are BR/RD & BR that need to be extended and relocated.

Fan:
Recently, I decided to beef up my cooling system by purchasing a SPAL fan from www.spalusa.com. The P/N that I purchased was 30102048, priced at $178. Make sure it mounts as CLOSE to the radiator as possible. The fan is pictured below.

For the coolant sensor installed on the engine, use the M20/M10/M42 sensor. You can either remove it from your M20/M10/M42 engine or buy a new one. For compatibility of the temp sensor, the M20/M10/M42 temperature sender should be used. It’s also cheaper b/c you should already have one from your M20/M10/M42
For the relay wiring for the electric fan, please refer to the Figure 46.

This is how to hook up your electric fan using an external relay. You can tap into your +12V battery supply through the remote +12V battery station located on the passenger side firewall. Ground can be anywhere on the chassis.
18.3 BLEEDING THE SYSTEM
Bleeding the system is difficult, but not impossible. Overheating is a constant issue if not dealt with properly. There are many techniques used to bleed the system. This depends on whether or not you have a heater core for heat. I do have a heater core like most people should, so the plumbing is a bit more complicated. You need to be very careful about air bubbles in the system. This is because when the engine gets hot, the air will expand and possibly explode your hoses. I finally got my temperature at a little bit past the ¼ mark when driving and right at the ½ mark when in traffic with the electric fan on. This is good enough for me. On a really hot day in standing traffic, the temp goes past ½ mark, then once I start moving, it slowly goes back to where it’s supposed to. Here are a couple techniques I used to bleed the system.
1. Do it with the engine running, so the coolant pump can circulate coolant as you pour. Do it when the engine’s cold so by the time the engine starts getting up to temp, you will have filled it already.
2. Hold the coolant reservoir physically as high as possible. I mean like 2 feet higher than the engine. You might want to have a friend hold it up for you as you pour the 50/50 mix into the tank. When you’re done, screw the cap on (when it’s still in the air), then install it in the engine.
3. Pour slowly! Let the mixture get into the actual engine and level off. If you pour too fast, you could create trapped air within the system.
4. Last but not least, try to have the car at a steep upward angle so that the front of the car is at a really high, steep angle. Jack up the front of the car, park on a hill, whatever. Doing this will force the air frontward and upward toward the bleed screw.
Try to test this after you think you’re done by letting the engine sitting for about an hour after you bleed. Squeeze the upper radiator hose. You shouldn’t hear any air going through the system and it should be pure coolant filling the reservoir every time you squeeze. That is a good sign that you properly bled the system. You can check to see if the heater core is working by obviously turning on the heat. If you have air in the system, it could be trapped there and the heat simply won’t be that hot. It should be really hot when you turn it on.
If you’re still finding that the engine is still overheating, then try this
1. Unscrew radiator drain plug and drain the Coolant to start over again.
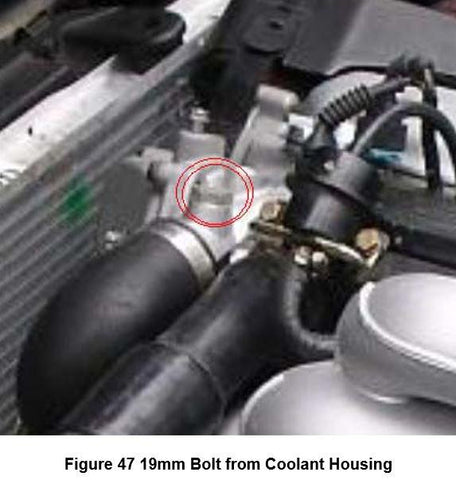
2. Unscrew one of the 19mm bolt from the coolant housing. See Figure 50.
3. Hold up coolant tank high in the air (make it the highest point in the system).
4. Screw radiator screw back in and then start to fill coolant slowly.
5. Once you see coolant spill out of this hole, wait…. And then fill more until it all levels out.
6. You might ask, “why not just use the bleeder screw”? It’s because the bleeder screw is on the closed side of the thermostat whereas this 19mm plug bolt is on the side of the thermostat that goes to the engine block and this will ensure that the engine block itself is filled with coolant and that air escapes the engine block.
7. Screw the 19mm bolt back in when full and screw the coolant tank cap.
8. Mount the coolant tank back where you installed it.
9. This should do it.