Air conditioning in an E30 serves more than just the purpose of keeping you cold. It is relatively rare in E30’s nowadays to have functioning air conditioning systems, let alone swapped E30’s to have working A/C. Most modders and racers will remove the AC to keep the weight of their car down, including swapped cars. This is understandable. However, in my mind, I wanted to execute a swap that had not only had the comfort, but functionality of a stock E30. Not to mention, having women in the car in the summer really helps having AC.
25.2 VITALS
25.2.1.1 TOOLS REQUIRED
Table 19
| Socket | Wrenches | Misc. |
| 13mm Socket | 17mm Wrench | O-Ring Pick |
| 19mm Wrench |
25.2.1.2 TIME & $$
- 6Hrs & $18
25.2.1.3 INSTRUCTIONS
R134A CONVERSION
While you’re at the A/C rebuild, you might as well convert to R134a. There are some advantages and disadvantages. Here are my points regarding R134a/R12.
1. R134a is cheaper to refill than R12. R12 is rare and very expensive to fill (couple hundred dollars by a shop) as opposed to buying $20 worth of refill cans at autozone/pepboys.
2. R12 is actually more efficient than R12, meaning that if you had the two systems in a side by side comparison, the R12 would actually blow colder than R134a. The way that you overcome this is to ether get a larger condenser or a better fan. While a condenser would be more effective, the fan is a relatively cheap and practical tradeoff. This is what I did.
3. To go to R134a, there are theories as to whether you should change out all of your seals and oil to R134a. While this has some merit and many have claimed no leaks without having changed any seals, it is definitely recommended. Especially if you have all of the tubing out of the car and can easily change them.
COMPRESSOR
The compressor to be used is the 540i compressor. This forces you to use R134a since the oil in the compressor from 1995 is already R134a, it is a no brainer. As shown in Figure 170, you can see the compressor fittings. These tubes are steel and can be cut/welded, which makes the modification much easier. In Figure 171, I cut the compressor lines and am ready to weld to the existing E30 lines.


COMPRESSOR WIRING
The wiring of the 540i E34 compressor is exactly the same as in the E30 compressor. Just remove the wiring from the E30 compressor and adapt the plug for the E34 compressor. There are 2 wires to the compressor: Signal & Ground. These wires do not go through the Engine Wiring harness. They go through the E30 Body harness.
Signal is the same on E30/E34. See below in Figure 172 for the signal pin on the connector. The ground just simply wires to the chassis through a ground loop.

As shown in Figure 172, The E30 wiring has 2 wires going to the compressor: 1 for the Signal and 1 to the ground. In the E34 wiring, there is only 1 wire coming from the wiring harness, and that is for the signal. The ground is already integrated into the compressor chassis, which by itself goes to ground. So, on the E30 body harness wiring, you need to ground it to either the E30 chassis or the compressor. It is your choice.
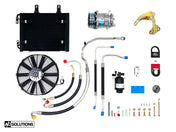
The E30 R12 system has 2 switches: A high Pressure and a Low Pressure switch. For the wiring of the pressure switches, www.bavauto.com sells an R134a kit, which includes a new High Pressure Switch. The R134a kit does not include a low pressure switch. The low pressure switch becomes shorted to itself as shown in Figure 173. The kit also comes with a new R134a version dryer and is well worth the money if you want efficient, cold AC.

REDESIGNING TUBING
Refer to Power Steering section for additional supporting information on welding these steel tubes. To upgrade to R134a, use the kit from www.autohausaz.com, click here. It’s approximately $18 and comes with all multiple sized O-Rings and the High/Low Pressure Inlets for the correct fittings. This does not come with the oil, which you do need to top off the compressor.

For the tubing, the diameters of the High & Low E30 Lines match up correctly with the High & Low lines on the E34 Compressor, so it should be easy to distinguish where each tube is to be attached to. Figure 175 shows the stackup on the diameters. Also, the final welded version.


FRAME RAIL MOD
Here are the steps to installing the compressor into its bracketry on the M60 engine. Figure 177
Test Fit
1. Install M60 Engine
2. Hold Compressor in place with hands (Friend help). Does not have to be 100% accurate. A rough placement will suffice. a. Keep the lines installed on the compressor as in Figure 171.
3. Take the previously cut E30 A/C Lines and line them up a. Tack the lines to the Compressor lines b. Make sure you have the correct diameters matched up.
4. Remove the O-Ring compressor lines from the compressor- They should now be tacked to the E30 lines.
5. Mark the frame rail modifications.
6. Remove everything and make the final modifications.
Final Fit – Weld all lines together.
1. Modify frame rail as shown below in Figure 177.
2. Install the compressor on to the engine.
3. Put engine in car.
4. Final weld all lines – Do pressure test to ensure that the welds produced no leaks.
5. Install lines on to compressor.

Modifying the frame rails is not a mandatory step (optional), depending on the position of your M60 engine. It is highly recommended due to the very close proximity of the compressor & lines to the fame rails. Since the engine rocks back and forth as you induce load on the engine, it is smart to do so.
A/C CONDENSOR FAN
The E30 fan would simply not do. I decided to modify the setup for an aftermarket pusher fan. The fan I decided to use was the $178.31 -16" 30102048 High Perf Pusher from www.spalusa.com. As shown in Figure 178, I used the SPAL curved blade fan. This makes up for the fact that I’m using less efficient R134a. While it is difficult to keep the air temperature in the 40’s during hot traffic days, it definitely helps as opposed to having the E30 one.

I installed this fan using the stock E30 condenser fan locations and hardware. It was slightly improvised for the swap, but it remains nice and snug in the radiator subframe.


