Engine Positioning is so important for proper functionality of your swap. You must take into account clearances and alignment. Clearances to the left and right will be fine, although be careful with the left/right frame rails, especially with the exhaust manifolds.
The Alternator and oil return line (Driver Side) is a big concern and is in very close proximity to the driver frame rail.
The A/C Compressor (Passenger Side) is dangerously close to the frame rail.
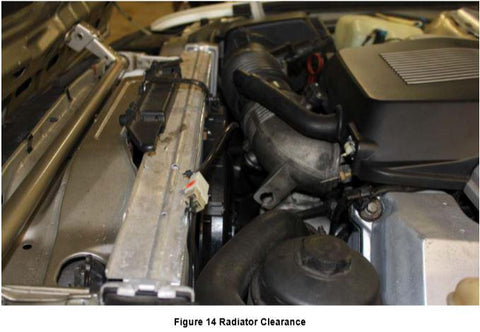
I widened my frame rails to account for the extra room for the 540i radiator as described herein.
Watch out for the oil pan to subframe, the radiator, and the hood. Of course your ground clearance will compromised if you use a coil over suspension and the car is consequently close to the pavement.
12.1.1 ENGINE POSITIONS
The theory behind engine positions is pretty basic. The further rearward you place the engine, the more “factory” the car will feel, maintaining BMW’s originally designed weight distribution. The brackets built by Garagistic will allow the engine to be placed in 2 positions.
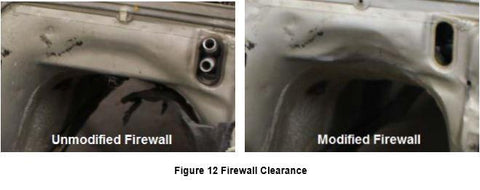
More rearward means less firewall clearance to the back of the cylinder heads. Room will need to be made for the rear of the cylinder heads. More importantly, however is the need to make room for the rear coolant pipe that connects to the left/right sides of the block. This part has the propensity to hit the firewall if the firewall is not banged back enough. I recommend 1” at the lower part of the tunnel. See Figure 12. More on that below:
Again, there are two holes per bracket as you can easily see in Figure 18. However, you can drill additional holes to position the engine how you wish and ONLY at your own risk. It is the mounts themselves that go through these holes to mount the engine. The further back you mount the engine, the less clearance issues you’ll have in the front end of the car. In a rearward position, the engine is as far back as it possibly can go and there will be no clearance issues with the radiator. If you go with a more forward position, there will be NO firewall modification, but the 325e or supereta driveshaft might have less spline contact between the 2 halves, but you can always lengthen it. It’s expensive to lengthen a driveshaft, and not worth the work and money when you can just move the engine back another half inch.
12.1.2 CLEARANCES
Don’t worry about clearances of the transmission. The 6 speed transmission will have very tight clearance with the transmission E30 Tunnel. Worry more about the clearance you’ll have at the back of the valve cover on the engine itself. It is very important that you do not destroy the 1/8” air intake nipple on the black plastic housing on the back of the cylinder head. This is used for the fuel pressure regulator.
This is how my placement looks at the back of the cylinder heads in Figure 13:

This is my left & right clearances to the frame rails in Figure 15
Figure 15- Left & Right Frame Rail Clearance


As you might see in Figure 16, I did have to bang back the firewall where the pedal assembly mates to the firewall. This ended up becoming a problem in the future installation of the modified pedal assembly, but I needed to massage the firewall to get it all to fit correctly.

12.2.1.1 TOOLS REQUIRED
Table 4
| Socket | Wrench | Misc. |
| M8, M10, Torx | 13mm Wrench | Sledgehammer - Firewall |
| 17mm Wrench |
12.2.1.2 TIME & MONEY
- 1/2Hr & $230
12.2.1.3 INSTRUCTIONS
M60 ENGINE BRACKETS:
You can also build your own brackets. It is certainly the cheapest option. However, in my opinion, it was worth the money to purchase already-built bracketry due to the uncertainty in my craftsmanship, welding and measurement devices. Driveline alignment is vital and purchasing a set that had already been tried/true was more important to me than saving some money from my budget. Building your own brackets isn’t necessarily difficult. It is timely, but if you are interested in constructing your own, follow the generalized step-by-step directions in Figure 17.

The preferred option is to purchase your engine brackets from a professional.
As for a suggested professional, it is highly recommended to use the tried and true brackets from Garagistic. Check their site for latest pricing. Current pricing is shown in 12.2.1.3. These guys not only have a complete kit for sale, but you can purchase the mounts/spacers kit separately. These mounts are professionally tig welded for superior strength, reliability and longevity in all driving conditions. They have been road tested, race proven, and can even be powdercoated to the customers’ needs.


SUBFRAME SPACERS:
Driveline alignment is so very important to drivability, reliability, durability, and overall enjoyment. While there are many reasons for a driveline to become misaligned (poor/old mounts, broken brackets…etc), there are ways to overcome and design a system that is perfectly in line. Fortunately, the work has already been done for us. I decided to utilize subframe spacers with my design. Please refer to Figure 20 for details on the brackets and spacers themselves.
There are draw-backs to using spacers. Those drawbacks include suspension geometry being forever changed from the original intent of BMW’s design methodology. In my personal experience, I have used the 10mm spacers in my design with no noticeable change in the way the car handles compared to stock (with the exception of the springs/sways/shocks). By bringing the subframe lower to align the driveline, you essentially RAISE the chassis by that same amount. An alternate consequence to using the subframe spacers is that you must subsidize this rise in chassis height by virtue of drop hats. I used E90 drop hats, which were 10mm. My suspension ride height after having settled is shown below in Figure 23. My setup includes stock M3 Springs, Bilstein Sport Shocks, and E90 10mm Drop Hats.
The subframe spacers are highly suggested to do this swap properly. Not employing subframe spacers results in driveline misalignment, which ultimately leads to vibration (oftentimes violent), and eventual expedited wear of your guibo. Again, you can find the spacers in Figure 20 and Figure 21.


When you install your subframe spacers, you need to lengthen the 4 subframe bolts in order to maintain adequate thread engagement with the frame. The factory size of these fasteners is M10x65. The new lengths of screws that you need are M10x75 Minimum Length, M10 x 85 Maximum Length. The bolts are shown below in Figure 22. These bolts are estimated to be approximately $15 at the hardware store.


There are many options for spacers, but I recommend Garagistic’s subframe spacers as in Figure 21. They’re inexpensive, convenient, and available. Garagistic offers the brackets/spacers package combination. Without spacers, your driveline will look like Figure 24. With spacers, your driveline will align properly with no shimmies, shakes, or vibrations as shown in Figure 25.

This is greatly exaggerated for effect. Essentially what is happening if the driveline is not aligned properly is that you are making the guibo work extra hard to keep everything in line. Meaning that in one full rotation of the driveshaft, you have the top portion of the driveshaft in compression with the guibo and on the bottom portion, you have expansion. This cyclical behavior will cause immense aggravated premature wear on the guibo and put unnecessary strain on your u-joints. Not to mention, you will feel a vibration as if you’re driving on square wheels. See below in Figure 26. Here, the guibo is bolted firmly to the transmission output where the driveshaft is loosely mounted to exemplify the space difference.

MOTOR MOUNTS:
Use M60 Motor Mounts with this swap. It is assumed that you were able to obtain motor mounts from either the junkyard or from your donor M60 drivetrain. There are multiple options with Motor Mounts as well. You can go with stock Rubber as shown in Figure 30. The failure mode of bad motor mounts is a vibration transferred from the engine to the subframe and throughout the chassis, so it is very noticeable when they fail.
If you are swapping in an e36/e46 rack or anything bigger than the e30 rack you must resort to use e39 525TDS motor mounts. (part number: 22111094248). They are 3cm higher and will give the needed clearance for the bigger steering racks. Another option is to simply shim the e34 motor mounts. If the stock e30 rack is used, US e34 540i v8 motor mounts will work fine.

Going the extra mile!
12.3.1.1 TOOLS REQUIRED
Table 5
| Socket | Wrench | Misc. |
| 13mm Socket |
13mm Wrench |
12.3.1.2 TIME & MONEY
- 3.1.2 1Hr & $120 Revshift + Low Profile
12.3.1.3 INSTRUCTIONS
M60 ENGINE BRACKETS:
Here is another option for employing a methodology without using subframe spacers. This kit that Garagistic offers includes slightly different motor mount brackets. These brackets can be found in Figure 28 which are actually “low profile”, allowing you to mount the engine as if it were lowered in the engine bay. While you have the added advantage of maintaining your existing front suspension geometry, you now must notch your oil pan.

Garagistic conveniently provides this service by either providing a notched oil pan for your install (you provide your oil pan as a core) or you have the ability to ship your oil pan to Garagistic to have them modify your actual oil pan for you. See Figure 29 for more details about the specific notches that are performed on your new oil pan.
Figure 29 Garagistic Notched Oil Pan
It is highly recommended that this be done by a professional tig welder. The oil pan is not a typical common type 4340 aluminum alloy. It cannot be easily tig welded by a fairweather mechanic. It is a cast aluminum material, which is difficult to weld and needs to withstand not only the temperature variation of the oil pan, but also the pressure. Cast aluminum also has the added need to apply pre & post heat when welding to prevent any coefficient of thermal expansion differences, resulting in premature cracks of the oil pan.
SUBFRAME SPACERS:
Spacers are not necessary in using the M60 Low-profile engine holders with notched oil pan
MOTOR MOUNTS:
Use M60 RevShift Polyurethane as shown in Figure 30. It really comes down to how sporty you want the driveline to feel. Remember that the polyurethane will transfer more energy to the chassis. The polyurethane bushings were purchased from RevShift as shown in a close up on Figure 30.