The minimum requirement for the transmission aspect of this write-up assumes you have a 5 speed transmission. Therefore, a driveshaft is much easier to source, if not free. Therefore, a driveshaft is not a contributing cost of doing this swap. If you decide that you would like to go 6 speed or have a completely brand new driveshaft sourced, then you can easily get it sourced by Garagistic.
The information in this section applies to both the 3.0L and 4.0Lblocks as they are all the same size. This section will be broken down differently than the rest of the write-up. I will split up the transmission section in 2 parts: 5 Speed and 6 Speed. I will discuss various aspects that need to be considered regarding the choice of transmission for the M60 Swap in the following terms:
- Transmission
- Clutch/Flywheel
- Driveshaft
- Transmission Brackets & Mounts
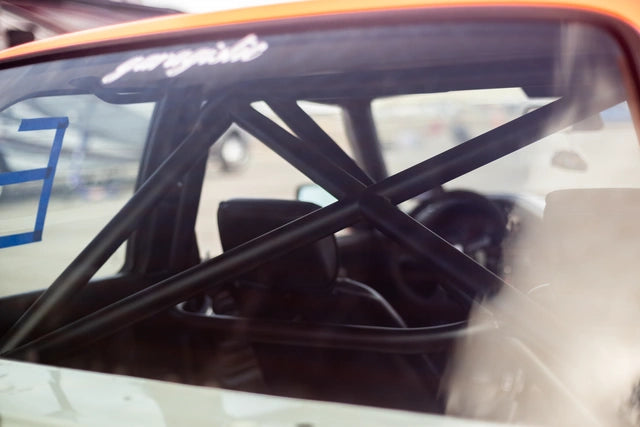
The mounting of the transmissions is not identical and needs to be addressed as far as 1. How many mounting bolts there are, 2. Each specific location and, 3. What is the size of each bolt. Please see Figure 32 for detailed snapshots and P/N’s of the affected mounting bolts.

5 SPEED ZF S5D
14.2.1.1 TOOLS REQUIRED
14.2.1.2 TIME & MONEY
- 2Hr & $0
14.2.1.3 INSTRUCTIONS
The ZF S5D 310Z/320Z 5-speed Transmission is also an option and its gear ratios are below. This data is only as accurate as the internet, but it’s a good start for a guide.
| 1 | 2 | 3 | 4 | 5 | R |
| 4.2 | 2.49 | 1.66 | 1.24 | 1.00 | 3.89 |
This transmission is relatively rare and is found on a few select models, but please take note on the year.
310Z/320Z - 95 M3
320Z – 96-99 E36 M3/328, E46 328/330 (5spd), E39 528/530 (5spd), Z3 2.8/3.0/3.2
320Z – E34 530i
The transmission itself can be found below in Figure 33.

The only remaining question is whether the E34 530i V8 flywheel is the same mounting pattern as the E36 328i/E39 528i/ Z3 2.8i clutch kit. That would make the entry level price point very attractive to do a V8 5speed swap, with an upgraded clutch that will not fail prematurely, due to the V8 torque difference...
M62 flywheels will fit on the M60 configuration, but only when used in the non OBD configuration, since the M60 flywheels have no CPS trigger ring on them. As far as the mounting patterns, depth, etc, they are the same.
14.2.2 CLUTCH/FLYWHEEL
The clutch and flywheel combinations for the ZF S5D 310Z/320Z 5-speed Transmission is just about endless and these combinations are scattered among the internet in forums and other write-ups. However, you can do a realoem search for the clutch P/N 21211223602 and you’ll see the where used being the following:
310Z/320Z - 95 M3
320Z – 96-99 E36 M3/328, E46 328/330 (5spd), E39 528/530 (5spd), Z3 2.8/3.0/3.2
320Z – E34 530i
Now you must decide if you are going to go with dual mass or single mass flywheel. The main difference is the feel and the options for upgrading to a lightweight flywheel.
Here is a proposed 5 speed setup for a dual mass flywheel, which was very common on the 5 series and 3-series with the M52 engine:
E39 OEM 540i Dual Mass flywheel
E36 328i or E39 528i or Z3 2.8i clutch kit P/N 21211223602
E34 530i clutch slave
Single mass flywheel options are all over the internet, so I’ll try to give you some options here. If you want the most selection out of a lightweight aftermarket flywheel, you are probably going to opt for 240mm diameter. There are other larger diameters out there like the E34 540i (265mm) and the E31 850i (280mm). Many claim that the increased torque capacity can be found in the larger diameter flywheel/clutch setups. And to an extent that is true. However, the E39 M5, which produces 394hp and 369lb-ft torque, is 240mm. After having that information, I opted to go with the 240mm setup that is offered by the following:
UUC Stage 2 Lightweight Flywheel for '92-'99 E36 3-series and M3, E34/E39 5-series with 6-cylinder M50series motor, B1-A-PO. OE-size V8 Flywheel and Clutch kit (moderate weight) - E39 M5 and Z8, B17-GPO
JBracing P/N 520-010-240, 520-030-240, 520-140-240, 520-150-240, 520-160-240. The many differences between these part numbers are the ring gear including ignition triggers for OBDII and the ignition system.
VACmotorsports No info available at the moment. Continue to check their website
Again, choose the flywheel for any of the following cars and I believe that 240mm will not only give you the biggest bang for your buck, but since there are so many options, you might get lucky and score one for cheap used as opposed to the $1000-$1500 Brand new price tag for a flywheel/clutch combo kit.
14.2.3 DRIVESHAFT
Stock E30 325 (supereta) or 325e driveshaft will fit without modifications. The E30 M3 works as well, but is rarer and more expensive new.
The ZF transmission will have the rear output shaft with the tri-prong holes appx 3.12” apart.
3.12” = 1987 325e, ’88 325 supereta
To be more accurate with the driveshaft flange differences, see dimension A Figure 35. This dimension corresponds to the 3.12” as described. Dimension A should match or you can’t hook up the driveshaft.
Garagistic conveniently offers a completely BRAND NEW driveshaft. This driveshaft will be fully balanced with all new internals, center bearing, sleeve, u-joints…etc. Check their site for latest pricing.
The location for more information on the Garagistic Driveshaft for the 5 speed is located at the link below, and pictured in Figure 34.

If you decide to use the Garagistic mounts as found in the Engine mount bracket section. They know exactly what you need based on the use of this transmission. This includes a 1 year warranty as well, which is impressive given that it’s going into your swapped E30. All you must provide to Garagistic is the following:
Year/model of the 5 speed
Year/model of the differential
These are made to order with a very quick 1 week lead time.

To Install the driveshaft, follow these steps:
1. Ensure that the Guibo is installed on the Transmission output shaft and 3 bolts are tightened. Also, ensure that the spline sleeve is loose so that the driveshaft halves can slide on each other.
2. Install the rear differential side first a. There are 4 studs that go right into the differential input shaft. This will lock the rear of the driveshaft in place easily. You don’t need to put the 17mm nuts on if you don’t want to. Just push it on.
3. Bend the driveshaft at the center bearing and slip the front end through the centering 3/8” pin which resides on the transmission.
4. Line up the holes on the guibo roughly.
5. Push the center of the driveshaft up into the tunnel and screw in the 2 13mm bolts, but do not tighten.
6. Preload the center bearing and tighten the 13mm bolts on the center bearing.
7. Now screw the input and output bolts/nuts.
14.2.4 BRACKET/MOUNTS
You can use the factory E30 transmission bracket for this application. The 5 speed transmission is shorter and can accompany the exact design of the existing E30 Transmission brace. Please see Figure 36 for a picture of the bracket.

Figure 36 Factory E30 Transmission Brace
14.3 6 SPEED GETRAG 420G
14.3.1.1 TOOLS REQUIRED
- Various
14.3.1.2 TIME & MONEY
- 2Hr & $500
14.3.1.3 INSTRUCTIONS
The GETRAG 420G transmission is capable of handling up to 370 lb-ft torque (although it’s been proven to handle much more than its rated torque). This data is only as accurate as the internet, but it’s a good start for a guide. I went with the 420G 6 speed transmission for many reasons. But mainly I decided that it was best because it was readily available from my 1995 E34 540i Donor Car. Some other reasons to go with the 6 speed is the cool factor for having a 6 speed E30. The ratios of were the following:
| 1 | 2 | 3 | 4 | 5 | R |
| 4.2 | 2.49 | 1.66 | 1.24 | 1.00 | 3.89 |
The GETRAG 420G was used in the following models:
1996-1999 BMW E36 M3 (Euro)
2001-2006 BMW E46 M3
1988-1995 BMW E34 540i and M5
1996-2004 BMW E39 540i and M5
1995–2001 BMW E38 7 Series
1989–1999 BMW E31 8 series
2000–2003 BMW E52 Z8
A picture of the 420G can be found below in Figure 37

One thing to note with the E34 GETRAG 420G from the E34 540i/6 was the input spline size of the transmission and the non-existence of the Hall Effect Switch that is resident on the 420G installed on the M62 bell housing. On an M62 or S62, as it lacks the mounting hole for the engine's hall effect timing pickup (on an M60, this pickup is taken off the main crank pulley).
Regarding the spline count of the 6 speed transmissions, the E34 540i/6 GETRAG 420G uses a 10 spline 1.375” count and the E39 540i/6 uses the 10 spline 1.125” count.
14.3.2 CLUTCH/FLYWHEEL
The E34 540i/6 used a slightly larger clutch disc diameter (265mm) that wasn't shared with much else, and as a result, parts will likely be harder to find (and/or more expensive) in the future than they will be for the E39 V8's (M62), both of which use the same clutch size (240mm - which also happens to be shared with the E34 530i and E39 540i/M5. don't try to mix and match parts between generations in the clutch assembly).
Read ahead to see if you fit the following criteria:
1. Your donor car was an E34 540i with the Getrag 420G 6 Speed (1995 540i)
2. You wish not to reuse the current E34 540i Clutch/PP/Flywheel Combo and wish to upgrade to a single mass flywheel aftermarket setup.
Unless you are using the E34 540i 265mm clutch setup, do not use the E34 540i stock clutch slave cylinder. Here is why. Use Figure 38 as reference:
The E34 540i utilizes a 26.99mm slave cylinder (made exclusively for the E34 540i with the 265mm clutch diameter with dual mass flywheel). When mated to the 19.05mm clutch master cylinder, which is available on just about every BMW, you must be careful about your force/travel/diameter relationship if you change the clutch/flywheel/pp.
When I upgraded my clutch/flywheel/pp combo to the E39 M5/540i version, I neglected to change to the corresponding 22.20mm slave cylinder. Because the fingers are SHORTER on the existing E34 540i pressure plate, there is more required force, but there is less distance traveled, hence the larger 26.99mm diameter slave cylinder. Since I changed to the new setup with longer fingers on the pressure plate, I now have a setup that doesn’t have enough throw to thrust them all the way to disengagement
Additionally, if your pedal feels “soft” and is on the edge of engagement, engaging as the pedal barely lifts off the floor, then you might have this problem. In that case, all symptoms would point to the slave being incorrect.

E34 540i Getrag 420G 6 Speed Flywheel Removal/Installation
Thin-shank T60 bit for removing old flywheel and installing the new flywheel (if you're using an OEM or equivalent unit)
24”-36" of 3/8" drive socket extensions, including one with a "wobble" end, or a universal joint (for getting at the trans bolts, especially the upper ones)
E10, E12, and E14 internal Torx bits (for the trans bolts. It would be a good idea to just as well just buy a full set.
clutch alignment tool
If you decide to go the performance route, you can use the following options: UUC OE-size V8 Flywheel and Clutch kit (moderate weight) - E39 540i with Performance Organic clutch $1599* Turner Motorsports E39 M5 JB Racing Aluminum Flywheel/Sachs 850CSi 280mm Clutch Package $1980*
14.3.3 DRIVESHAFT
The 420G 6 speed transmission will have the rear output shaft with the tri-prong holes exactly 4” apart as shown in Figure 39. The front half of this driveshaft can be found on the following models:
- E31 840Ci Coupe
- E31 840i Coupe
- E32 740i Sedan
- E32 740iL Sedan
- E34 540i Sedan
- E38 740i Sedan
- E38 740iL Sedan
- E38 740iLP Sedan
- E38 750iL Sedan
- E38 750iLP Sedan
- E39 540i Touring
- E39 540i Sedan
- E39 540iP Sedan
To be more accurate with the driveshaft flange differences, see dimension A in. This dimension corresponds to the 4” as described. Dimension A should match or you can’t hook up the driveshaft.

Installation of the 6 speed driveshaft is to be followed by the same process as that for the 5 speed explained earlier and shows Figure 40 as another opportunity to explore how to remove/install the driveshaft.

Garagistic conveniently offers a completely BRAND NEW driveshaft specifically designed for the E30 6 Speed Conversion. Check their site for latest pricing. Current pricing is depicted in 12.4.1.3. This driveshaft will be fully balanced with all new internals, center bearing, sleeve, u-joints…etc. If you decide to use the Garagistic mounts as found in the Engine mount bracket section. They know exactly what you need based on the use of this transmission. This includes a 1 year warranty as well, which is impressive given that it’s going into your swapped E30. All you must provide to Garagistic is the following:
- Year/model of the 5 speed
- Year/model of the differential
These are made to order with a very quick 1 week lead time.
The location for more information on the Garagistic Driveshaft for the 5 speed is located at the link below, and pictured in Figure 34.

In the event that you wish to undergo your own make-shift transmission, it will be difficult if not impossible to find one that fits the bill. This is because the front half of the driveshaft will need to be shortened no matter what configuration you decide to use on the 6 speed transmission. Using the 6 speed transmission yields a much shorter distance between the transmission output shaft and the center bearing mounting location on the E30. Consequently, the front half section of the driveshaft will need to be not only from the E34 5 speed, but shortened as well.
Note that you cannot simply hook up the E34 front half driveshaft to the E30 rear since the splines will not mate up. See below:

Garagistic is the preferred vendor for supplying shorteened custom driveshafts for the 6 speed transmission in the E30
14.3.4 TRANS BRACKET/MOUNTS
When using the 6 speed transmission, which is much longer than the 5 speed, you must extend the mounting locations when using the E30 transmission brace. See below for the same picture as in Figure 36, but with the extended arms. I cannot provide the actual dimensions as each installation will be slightly different. Here are the steps to build your custom E30 6 Speed Transmission Bracket.
1. Install Drivetrain in desired position
2. Put jack underneath transmission housing, pushing it up to the correct driveline angle a. Ensure that the guibo is firmly installed to the transmission output shaft. b. Loosely install the driveshaft to ensure that the driveshaft is aligned. See ALIGNMENT. c. Ensure that your transmission mounts are installed on the bracket as shown in Figure 36.
3. Install the mounts/bracket on the transmission in its desired location.
4. Gather your spare metal (1” x 1/8” x 8” Long is sufficient)
a. Don’t worry about cutting the metal to length yet
5. Place the metal plates in the position necessary to allow the body mounting studs (2 on each side) to fit into the holes that you plan to cut into the metal plates. a. Mark the installation with a marker – Hole locations, where to mount, and weld to the bracket.
6. Remove the bracket and weld. See Figure 44

Figure 44 Bracket & Metal Plates Ready for Welding
Note that the bolts as shown in Figure 27 can SLIDE forward and rearward. This means that you don’t necessarily need to concern yourself with mounting the bracket in that axis since it will slide and move. Just make sure that you mount it in the correct location width-wise.

Figure 45 Body Sliding Studs/bolts

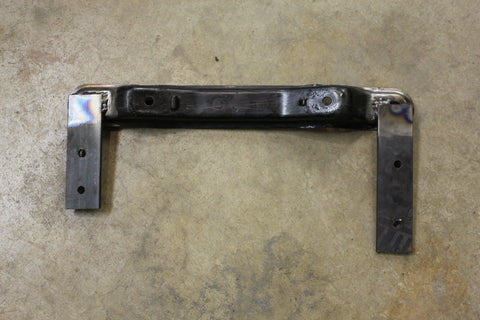
Figure 46 Complete Bracket & Welds & Installation

Figure 47 Installation of Bracket in E30
While building your own 6 speed transmission mount extensions is not difficult, there are always other options, tried and tested, that define a more accurate and proven result. The extensions offered by Garagisitc are paramount to a DIY extension and comes with the M60 E30 Swap Kit as an option for small cost. If you refer to Figure 48, you can see the quality of this sub-kit for your M60 swapped E30.

The great part about this kit is that it comes with gussets already for increased strength. This is a very useful and powerful feature when driving in rough conditions.