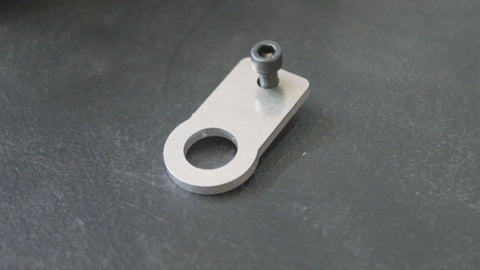
E30 brake booster delete bracket instructions - K0601-K0602

Whats needed?
- Garagistic LLC e30 brake booster delete bracket - found here
- Wilwood 340-11299 Brake and Clutch Pedal Assembly
- Early e30 brake pedal switch
- (3) 90 degree 1/8-27 NPT male to 3/16 standard female fittings (optional)
-We recommend always using a little blue Loctite make sure nothing on your e30 gets loose! This is the version we recommend: https://amzn.to/3MWIUlO
You will also need 3 master cylinders. 2 for the brakes and 1 for the clutch. For most customers a 5/8 bore for the brakes keeps the pedal effort to a minimum and safe.
The correct 5/8 master cylinders needed can be found here: Wilwood 260-10371 Short 5/8" Bore Master Cylinder Kit
For the 3/4 bore clutch we recommend this version:3/4" BORE, WILWOOD, PART # 260-10372
Note: Will not work in Airbag e30 cars. To use this in airbag car, you must switch to a steering column from a NON-AIRBAG car.
Step 1: First thing we will be doing is installing your brake switch. The Garagistic LLC kit includes a bracket for your early model e30 brake switch including hardware. You must use an early e30 unit (early e30 = round, late e30 = square)!


Using a snap ring pliers, remove the retaining clips from the brake pedal. Push the sleeve out and remove the pedal. Be sure to note order for reinstalling later. You will then place the brake switch bracket provided from us on the pedal "ribs" below of assembly. You will be using the side closest to the brake pedal pivot.

No need to worry if you get it wrong, you will notice that the brake switch will not reach if put on the further rib from the brake pedal pivot. Use a 13/64” drill bit to drill through the pedal assembly "ribs". Then using the hardware we provide, bolt up your brake switch bracket. (if you desire, you may bend the bracket for a better fit. Although it's not necessary). You may now reinstall brake pedal (wait to install actual brake switch til on the car, that way you may use the two factory brake switch bolts to adjust distance as needed).
Step 2: Here we take care of all of the throttle linkage issues that arise. Remove the factory e30 throttle bracket.
You will need to dremel/file off a tiny bit off the wilwood/tilton pedal assembly. This is for the throttle cable clearance. The location you need to dermel file is: 20 mm away from the clutch pedal, 9 mm wide. (see picture).


Next, you will need to shorten the factory e30 throttle linkage by 35mm. To do this, find the end of the linkage were the factory cable is attached. You will cut the 35mm from the top of this bracket and re-drill the throttle cable hole. This modification is needed to clear the pedal box. You are fitting alot under the dash, so this is a small price to pay!


Step 3: Install all 3 master cylinders and adjust balance bar to your preferred settings. Do this before installing pedals to Garagistic LLC brake booster delete bracket.
Step 4: There are 4 1/4" bolts (included with Garagistic booster delete bracket) that hold the pedals to the top of Garagistic LLC brake booster delete bracket. Hand tighten the uncovered two first, then the "covered" bolts (the two holes in the top are "service holes" to assist you). Leave them loose.

Step 5: Using the 5/16 hardware provided with the Garagistic booster delete bracket, place the 4 5/16 bolts through all 4 bottom holes. Washers and nuts are included with the kit. You may now tighten all bolts. Refer to your pedal assemblies maker on torque specs.
Note: Wilwood mentions that the pedal assembly is designed to use all four top 1/4" bolts and two or more of the 5/16 bottom bolts. However, are kit includes 4 upper bolts and 4 lower bolts. These are your brakes. Not a place to cut corners. Use all hardware we provide. Be safe.
Step 6: If you have not already done so, remove your dash. The service manual/forums have "how to's" for this process. Once you remove your dash, remove the factory pedals. This consists of three upper bolts and 4 firewall bolts. Save the factory bolts that go up top. You will need them for your new pedal assembly.

Install the assembled pedals and Garagistic booster delete bracket using the upper 3 bolts. Hand tighten only. We will now be drilling the three holes that hold the assembly from the "back".

Step 7: While the assembly is bolted in the front. Drill the center hole through the firewall ledge for the sandwich plate. We recommend a 21/64 drill bit. USE PROPER EYE PROTECTION!
In the engine bay, you may now set the sandwich plate in place. There is a ledge on the firewall. using the hardware (washers/bolts/nuts) we provided in our kit. Insert the bolt in the center hole you drilled. Secure it with a nut. Now, you can see where the other two holes need to be drilled. When you are done, tighten everything up.

Step 8: You can now route the lines and reservoirs and mount them in the final area. Most put them in the engine bay, although some race cars put them in-car. Make sure you tighten all clamps!
Step 9: You must now plumb the lines to the new location under dash. This is where those (3) 90 degree 1/8-27 NPT male to 3/16 standard female optional fittings come in handy.


.JPG)


