


The Official 15 Year Anniversary 2026 Garagistic Meet!
WHEN: Sunday, March 15th, 2026TIME: 9:00 AMWHERE: Garagistic - 6372 Industry Way, Westminster, CA 92683 Join us for a day of cars, community, and good vibes! RSVP HERE! Come check...


E28 Odometer Gear Repair Set (528, 535, M5) is backordered and will ship as soon as it is back in stock.
As soon as your order is ready, we will let you know! We are open weekdays 9AM-5PM.
Free standard shipping on orders over $300 *Restrictions apply
30-day money back guarantee on new and uninstalled products. Restrictions apply, full details below.
Garagistic is committed to 100% customer satisfaction! If you are unsatisfied with your purchase, you may return your purchase within 30 days of the delivery date STILL IN ITS ORIGINAL PACKAGING. WE DO NOT ACCEPT RETURNS ON ANY USED OR INSTALLED PARTS. Some items will be subject to a 20% restocking fee, as well as any order returned after 30 days. We do not accept returns on clearance items. All clearance items are final sale and the buyer is responsible for confirming fitment of any application outside of stock configuration. We do not accept returned customized or made-to-order items such as chassis mount shifters, supreme OEM shifters, driveshafts, wiring harnesses, engine mounting kits, roll bars etc (please contact us if you are unsure if you part falls under this category). All products we carry from other vendors, such as NRG Innovations and LINK ECU are ineligible for return. We do not refund shipping costs. We reserve the right to refuse a return on any orders after 30 days. On returns authorized past 30 days from the delivery date, we reserve the right to give store credit instead of a refund (please reach out to confirm). We absolutely do not accept used or damaged items for return. It is your responsibility to make sure that returned items arrive to us in good condition. Please pack your items accordingly. We reserve the right to refuse a return on any items not authorized beforehand. It is the customer's responsibility to arrange return shipping for any items that are rejected through the return process.
Our automated system will help with all your return and exchange requests. Our self-service returns center will pull your order information with your email or order number. Begin below at this link:
Because we are very small company with a limited amount of humans, the only way to return or exchange an item is through this system. Its VERY easy to use and will walk you through everything. You may call us if you need help with the system, however, we suggest you try before calling. When you call or email, we are dedicated to giving you as much help as you need. We don't mind the calls, we don't mind the e-mails, but please, please, please be aware that every phone call or email takes valuable time away from actually building and shipping the orders. There are only 8 guys working here and the fewer detailed updates we give, the faster we can ship orders, release more epic parts, and help with technical issues. Any extra love and patience you give us is an investment we'll put right into getting your parts and service needs.
https://www.garagistic.com/pages/terms-and-conditions
https://www.garagistic.com/pages/delivery-information

E28 Odometer Gear Repair Set (528, 535, M5) is backordered and will ship as soon as it is back in stock.
Like most odometers in classic BMW's, your E28s odometer probably long stopped counting miles driven and trip odometers decided to stop as well. We have a solution to fix this problem without breaking the bank. With some basic tools, some time, and our gears; it is an easy fix! E28: US spec. 1982 to 1988 528, 535 (includes E, ES and S models).
The three gears that are needed for replacement are included. We no longer include two spacers since our newest design includes a stand off (post) that keeps the gears spaced correctly and moving smoothly (just like the original OEM gear design). The factory gears become soft over time (imagine how a stale Oreo cookie would feel when broke in half; that is what the gears in your current broken gauge feels like).
Our gears are quality made with OEM superior material with a quality fit and finish. The longevity of these gears will outlast your car! When purchasing our kit be sure to check out our INSTALLATION GUIDE.
This guide should only be used to help you as a suggested way to fix your equipment. They are not intended to be the only way to do. Its your responsibility if any damage occurs. If you are not sure of any part of these instructions, feel free to send us an email, we would be happy to help.
There are many small pieces involved with this. So proceed with caution, use common sense and proper safety measures.
Please be aware that we are not responsible for any damages that happen. By using this guide you understand that we have made this only to make installation easier for you. However, do to the age of these things, every gauge cluster has been through a different life.
- Assortment of philips screw drivers
- needle nose pliers
- flat screw driver
- a little patience
- About 45mins. This is something that takes patience. You're dealing with lots of tiny pieces.
Remove the 9 philips screws in the back of your gauge. When placed down, be careful not to brake the tabs!
.JPG)
When removing rear panel, take note of the two lower tabs and be sure to pull straight up or damage to connectors inside may happen.
.JPG)
Remove the 4 philips screws that hold the odometer in place. Before you try to take out the cluster, do not forget the connector at the bottom. There are tabs that hold it in place. Once this is out you can pull straight out because there are connectors holding. DO NOT BEND! We found its best if you hold the cluster as it was placed in the car that way it doesnt fall out.
.JPG)
.JPG)
.JPG)
.JPG)
When odometer is out, you will see the gears on the side. There should be three. See the damage.
.JPG)
.JPG)
There are two screws holding a clear cover over the gears. Remove them.
.JPG)
.JPG)
The gears can then be replaced in the order they are taken out. They fit in an interlocking stacking setup. Notice that the gears are very soft and will fall apart as you try to remove them. NOTE: There is a brass bushing on the smaller 12 tooth gear. Its on the shaft and needs to be removed to install the new gear. You do not need this bushing with the new gear. DO NOT TRY TO PULL THE BUSHING OFF WITH ANY TOOLS AS THIS WILL DAMAGE THE MOTOR. Best way is to use a pair of plyers and lightly squeeze the bushing from one side, then the other. Then it ill slip right out. Do not use too much force!
Dont forget to install out spacer to keep the gears spaced correctly. DO NOT PUSH IT ALL THE WAY DOWN AGAINST THE GEAR. THIS WILL CAUSE THE GEARS TO BE PINCHED AND NOT BE ABLE TO MOVE!
.JPG)
.JPG)
.JPG)
.JPG)
.JPG)
.JPG)
.JPG)
![]()
.JPG)
.JPG)
Put togther in reverse order. Be sure you have gotten all the old pieces of the gears out so you have no future problems. Before closing everything up be sure to run the gears by hand to make sure everything is right and working correctly.
ENJOY! No more guessing when the next oil change is!

Payment methods
Your payment information is processed securely. We do not store credit card details nor have access to your credit card information.


WHEN: Sunday, March 15th, 2026TIME: 9:00 AMWHERE: Garagistic - 6372 Industry Way, Westminster, CA 92683 Join us for a day of cars, community, and good vibes! RSVP HERE! Come check...

The New Era of BMW Engine Swaps is Here: Welcome to the B48 Revolution BMW swaps are entering a completely new chapter and the B48 is at the center of it....
At Garagistic, we don’t just make parts—we bring history back to life. The BMW E30/E36 Gr.A DTM Gas Pedal is one of those rare pieces that blends OEM motorsport heritage...
The Comprehensive E30 5-Lug Swap Guide Overview This is a detailed parts and information guide on converting an e30 to a 5-lug setup. Read the whole guide before attempting this project....
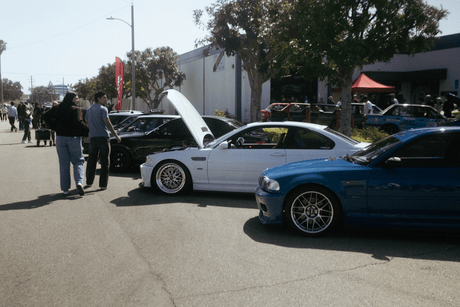
The annual Garagistic Meet 2025 recap video! This meet has grown a lot in the last few years and we're very grateful for all those who support us and the...

Attention racers! Garagistic is back with another deep-dive lap guide—this time for the legendary Chuckwalla Valley Raceway. Whether you’re a first-timer or a returning driver looking to shave off a...

WHEN: Sunday, March 23rd, 2024TIME: 9:00 AMWHERE: Garagistic - 6372 Industry Way, Westminster, CA 92683 Join us for a day of cars, community, and good vibes! RSVP HERE! Come check...
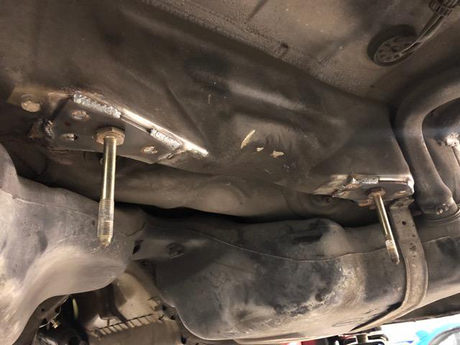
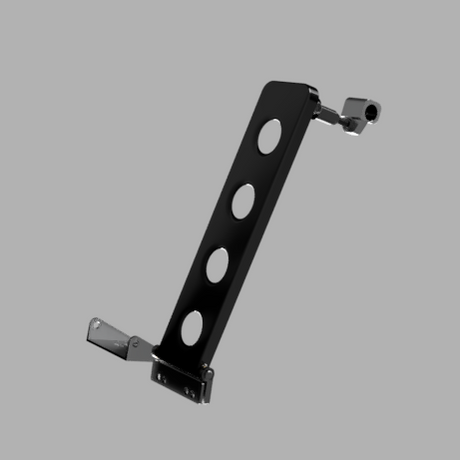
E36 Chassis Reinforcement Kit Photo Guide & Installation Overview Install Notes IMPORTANT: Professional Installation is recommended! Fitment: All of these reinforcements require welding and may require minor modifications (bending/grinding) to...

Like most odometers in classic BMW's, your E28s odometer probably long stopped counting miles driven and trip odometers decided to stop as well. We have a solution to fix this problem without breaking the bank. With some basic tools, some time, and our gears; it is an easy fix! E28: US spec. 1982 to 1988 528, 535 (includes E, ES and S models).
The three gears that are needed for replacement are included. We no longer include two spacers since our newest design includes a stand off (post) that keeps the gears spaced correctly and moving smoothly (just like the original OEM gear design). The factory gears become soft over time (imagine how a stale Oreo cookie would feel when broke in half; that is what the gears in your current broken gauge feels like).
Our gears are quality made with OEM superior material with a quality fit and finish. The longevity of these gears will outlast your car! When purchasing our kit be sure to check out our INSTALLATION GUIDE.
This guide should only be used to help you as a suggested way to fix your equipment. They are not intended to be the only way to do. Its your responsibility if any damage occurs. If you are not sure of any part of these instructions, feel free to send us an email, we would be happy to help.
There are many small pieces involved with this. So proceed with caution, use common sense and proper safety measures.
Please be aware that we are not responsible for any damages that happen. By using this guide you understand that we have made this only to make installation easier for you. However, do to the age of these things, every gauge cluster has been through a different life.
- Assortment of philips screw drivers
- needle nose pliers
- flat screw driver
- a little patience
- About 45mins. This is something that takes patience. You're dealing with lots of tiny pieces.
Remove the 9 philips screws in the back of your gauge. When placed down, be careful not to brake the tabs!
When removing rear panel, take note of the two lower tabs and be sure to pull straight up or damage to connectors inside may happen.
Remove the 4 philips screws that hold the odometer in place. Before you try to take out the cluster, do not forget the connector at the bottom. There are tabs that hold it in place. Once this is out you can pull straight out because there are connectors holding. DO NOT BEND! We found its best if you hold the cluster as it was placed in the car that way it doesnt fall out.
When odometer is out, you will see the gears on the side. There should be three. See the damage.
There are two screws holding a clear cover over the gears. Remove them.
The gears can then be replaced in the order they are taken out. They fit in an interlocking stacking setup. Notice that the gears are very soft and will fall apart as you try to remove them. NOTE: There is a brass bushing on the smaller 12 tooth gear. Its on the shaft and needs to be removed to install the new gear. You do not need this bushing with the new gear. DO NOT TRY TO PULL THE BUSHING OFF WITH ANY TOOLS AS THIS WILL DAMAGE THE MOTOR. Best way is to use a pair of plyers and lightly squeeze the bushing from one side, then the other. Then it ill slip right out. Do not use too much force!
Dont forget to install out spacer to keep the gears spaced correctly. DO NOT PUSH IT ALL THE WAY DOWN AGAINST THE GEAR. THIS WILL CAUSE THE GEARS TO BE PINCHED AND NOT BE ABLE TO MOVE!
![]()
Put togther in reverse order. Be sure you have gotten all the old pieces of the gears out so you have no future problems. Before closing everything up be sure to run the gears by hand to make sure everything is right and working correctly.
ENJOY! No more guessing when the next oil change is!


